from the Notes 8 forum,
For those building Composite Applications here is the latest version of the multi-media tutorial on building Notes 8 Composite Applications using IBM Education Assistant. It provides a great overview of Composite Applications, as well as, detailed step-by-step instructions on how to build one:
more
Thursday, November 22, 2007
Wednesday, November 21, 2007
SnTT : The Simplest Property Broker Example in Notes 8
Recap

I created a new composite application (CA) from the " - blank composite application - " template, which promptly opened to show me the message
"This application page does not contain any content".
I opened the application with Designer and added a view and a form - nice and simple. Next I wanted to add a few documents. I needed to edit the composite application and add the notes form and view. Then from the action > edit application you can access the composite application editor and under the right hand side flyout pane (components palette) is the form and view.
I dragged the view into the blank page and closed the CA Editor, it now looks like an old school Notes database. I could then add in a few data documents ready for the next steps.
Packaging the Plugin
What you need to do is package up the plugin into a format that you can install into ND8. This is through the tried and tested update-site-format. If you have applied patches or upgraded RAD/RSA you would be very familiar with this way of installing plugins and updates.
The instructions to update the plugin build properties, create a feature and generate an update site are in the tutorial "CompAppsTutorialPart2M4.pdf". I followed these instructions and built the update site. So far so good.
Installing a plugin
Back to the Notes application and the CA Editor. I need to add into the component palette my two ViewPart (TargetView and SourceView). To add components you right click, then choose Add Components > Add Components from Update Site.
My update site is in local directory, under my workspace directory. so I browsed to the site.xml and clicked OK. I was then given a dialog to select the components from the update site. Strangely the SourceView component was missing. No drama as it's the TargetView component that I needed anyway. I added the component and then dragged it onto the main page. Positioning can be a tad awkward. If you want to have the component on the bottom most part of the screen then you will need to drag the cursor right to the bottom of the screen.
Wires
In the left hand menu I selected the 'source' component the Default View (notes) component and right click then wiring - I could see the 'sets the target message' action in TargetView but there was nothing to wire from. I could see the 'Default View' component but no property.
oops...More wires

 SnTT
SnTT
I've created a very simple, if not the simplest, property broker example using the Expeditor Toolkit. The idea is to understand the property broker and wires as part of the new breed of applications that integrate eclipse plugins and ND8.
In keeping with the 'simple' theme, I wanted a simple database...err...application that would have a simple notes view, when I select a document in the notes view the content in the column is sent to the text box on the TargetView view part.
Blank Composite Application
In keeping with the 'simple' theme, I wanted a simple database...err...application that would have a simple notes view, when I select a document in the notes view the content in the column is sent to the text box on the TargetView view part.
Blank Composite Application
I created a new composite application (CA) from the " - blank composite application - " template, which promptly opened to show me the message
"This application page does not contain any content".
I opened the application with Designer and added a view and a form - nice and simple. Next I wanted to add a few documents. I needed to edit the composite application and add the notes form and view. Then from the action > edit application you can access the composite application editor and under the right hand side flyout pane (components palette) is the form and view.
I dragged the view into the blank page and closed the CA Editor, it now looks like an old school Notes database. I could then add in a few data documents ready for the next steps.
Packaging the Plugin
What you need to do is package up the plugin into a format that you can install into ND8. This is through the tried and tested update-site-format. If you have applied patches or upgraded RAD/RSA you would be very familiar with this way of installing plugins and updates.
The instructions to update the plugin build properties, create a feature and generate an update site are in the tutorial "CompAppsTutorialPart2M4.pdf". I followed these instructions and built the update site. So far so good.
Installing a plugin
Back to the Notes application and the CA Editor. I need to add into the component palette my two ViewPart (TargetView and SourceView). To add components you right click, then choose Add Components > Add Components from Update Site.
My update site is in local directory, under my workspace directory. so I browsed to the site.xml and clicked OK. I was then given a dialog to select the components from the update site. Strangely the SourceView component was missing. No drama as it's the TargetView component that I needed anyway. I added the component and then dragged it onto the main page. Positioning can be a tad awkward. If you want to have the component on the bottom most part of the screen then you will need to drag the cursor right to the bottom of the screen.
Wires
In the left hand menu I selected the 'source' component the Default View (notes) component and right click then wiring - I could see the 'sets the target message' action in TargetView but there was nothing to wire from. I could see the 'Default View' component but no property.
oops...More wires
I had forgotten to add in the Notes side of the wiring. I created a new wiring properties (sample.wsdl), then opened the WSDL file with the editor and added a notesValue property, updated the namespace to cahelloworld.nsf and added a setter and getter action. The dialog is the same as the wiring editor in the Expeditor Toolkit.
It was still not working. Come to think - how would the view know which property change has happened ? In the column properties in the 'Programmatic Use' tab there is a new setting on the bottom just for this...
Composite Settings : Property

In the drop down there was only one choice 'notesValue'. When I went back to the Wiring Editor and the 'notesValue' property was showing. I wired them together and closed the CA Editor and the text box had a value. I selected the other documents and the text changed in the eclipse plugin.

I also found out why the SourceView wasn't listed when I came to add the component. In the plugin.xml the TargetView Extention element 'allowMultiple' wasn't set.
The eclipse documentation specifies that...
allowMultiple - flag indicating whether this view allows multiple instances to be created using IWorkbenchPage.showView(String id, String secondaryId). The default is false.
Summary
On the whole the packaging up of the site and installation was fairly easy - until I moved the cahelloworld.nsf to another workstation. I'm not entirely sure about the deployment and distribution of a CA. One of the great thing about Notes applications is that deploying an application and new version is an easy process. Update the templates, maybe run agents to modify documents and thats it. Even if you have a Dev/UAT/SIT/Production type environment, it is still relatively simple. CA's will add another level of complexity to the equation.
I also found that the Help > Support > View Trace (and View Log) is helpful in tracking down property broker issues. Have a go at installing the BIRT sample in a directory other that the Notes data directory and then having a look at the Trace and Log. BTW the report does not generate, so don't hang around waiting. The logs show why.
So, there you have it. Quite possibly the most simple eclipse plugin and notes 8 composite application example.
It was still not working. Come to think - how would the view know which property change has happened ? In the column properties in the 'Programmatic Use' tab there is a new setting on the bottom just for this...
Composite Settings : Property
In the drop down there was only one choice 'notesValue'. When I went back to the Wiring Editor and the 'notesValue' property was showing. I wired them together and closed the CA Editor and the text box had a value. I selected the other documents and the text changed in the eclipse plugin.
I also found out why the SourceView wasn't listed when I came to add the component. In the plugin.xml the TargetView Extention element 'allowMultiple' wasn't set.
The eclipse documentation specifies that...
allowMultiple - flag indicating whether this view allows multiple instances to be created using IWorkbenchPage.showView(String id, String secondaryId). The default is false.
Summary
On the whole the packaging up of the site and installation was fairly easy - until I moved the cahelloworld.nsf to another workstation. I'm not entirely sure about the deployment and distribution of a CA. One of the great thing about Notes applications is that deploying an application and new version is an easy process. Update the templates, maybe run agents to modify documents and thats it. Even if you have a Dev/UAT/SIT/Production type environment, it is still relatively simple. CA's will add another level of complexity to the equation.
I also found that the Help > Support > View Trace (and View Log) is helpful in tracking down property broker issues. Have a go at installing the BIRT sample in a directory other that the Notes data directory and then having a look at the Trace and Log. BTW the report does not generate, so don't hang around waiting. The logs show why.
So, there you have it. Quite possibly the most simple eclipse plugin and notes 8 composite application example.
Attachments.
com.scius.examples.helloworld.updatesite103.zip
cahelloworld-nsf.zip
Thursday, November 15, 2007
SnTT : Quite possibly the simplest property broker example
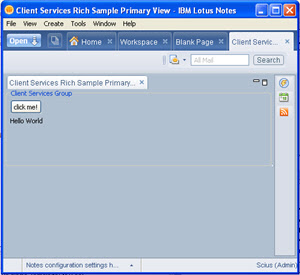
I've completed step two of my "Adventures in Expeditor Toolkit". It is quite possibly the simplest property broker example. One target view, one source view and one property.
I looked the the Color Swatch example that comes with the toolkit. It had multiple properties and three views and the naming convention for a beginner was a little convoluted.
I decided to create my own 'hello world' property broker example. I've attached a zip of the workspace it you want to run it or browse the files.
This purpose of this post is to share with you a very simple example to get to grips with the Property Broker and Wires. Something that the average Lotus/Notes Developer can look at, run and understand.
About the Hello World Example
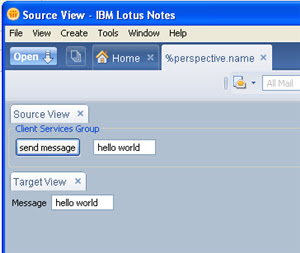
I wanted a component where I could enter some text and using the property broker, send this to another component for display.
I started with the New > Project > Client Services > Client Services Project followed the prompts including choosing the 'rich basic application' which generates some of the bits required for the project. I then looked at the Color Swatch sample and worked out which parts needed changing. If you need step by step instructions on how to create a composite application, wires and actions in Expeditor then you should look at the redpiece, redbook, and the tutorial posted in the nd8 forum .
So lets have a quick look at the parts of the puzzle.
Perspective.java - this pulls the components/view parts into the application and is one of the first files run
SourceView.java - the view part that contains, the field to enter the message and a button to trigger the location of a property, changing the value and sending the notification that a property had changed
TargetView.java - the view part that sets the text box with the value of the change property
TargetHandler.java - the action that is called by the property broker, and checks if the event is a property change event, and calls the TargetView to update the text box with the new value.
source.wsdl - contains getSourceMessage action and outgoing property MessageItemValue
target.wsdl - contains setTargetMessage action and incoming property MessageItemValue
I had all the parts of the puzzle there, but I couldn't get the Wiring Properties Editor to produce the same WSDL file as the Color Swatch example, so in the end I updated the file manually to set the actionNameParameter attribute and remove the boundTo="request-attribute" attribute. I also renamed the <portlet:param name/> to setMessageValue for target.wsdl and getMessageValue for source.wsdl
I could run up the application, but nothing happened. I added a few debug lines and I could see that the property was being set in java but what about the property broker.The post on the Composite App details how to trouble shoot with the OSGi console. You can enter these commands in the eclipse console at the osgi>
pbsh p - showed me the current properties
-----------------------------------------
Owner = com.scius.examples.helloworld
There are 2 properties registered.
-----------------------------------------
Name: setMessageValue
Namespace: http://www.w3.org/2001/XMLSchema
Type: string
Class: class com.ibm.rcp.propertybroker.internal.property.PropertyImpl
Default: null
Direction: [IN]
Is Wired: NO
-----------------------------------------
Name: getMessageValue
Namespace: http://www.w3.org/2001/XMLSchema
Type: string
Class: class com.ibm.rcp.propertybroker.internal.property.PropertyImpl
Default: null
Direction: [OUT]
Is Wired: YES
-----------------------------------------
pbsh a - shows me the actions
-----------------------------
NAME: getSourceMessage
Handler Type: SWT_ACTION
Runnable Type: com.scius.examples.helloworld.actions.SourceAction
Owner ID: com.scius.examples.helloworld
Name Parameter: ACTION_NAME
Parameters: 1 parameters
Property = getMessageValue
Property NS = http://www.w3.org/2001/XMLSchema
Type: string
Property ClassName = java.lang.String
Property default Value = null
Direction: [OUT]
-----------------------------
NAME: setTargetMessage
Handler Type: SWT_ACTION
Runnable Type: com.scius.examples.helloworld.actions.TargetHandler
Owner ID: com.scius.examples.helloworld
Name Parameter: ACTION_NAME
Parameters: 1 parameters
Property = setMessageValue
Property Title =
Property NS = http://www.w3.org/2001/XMLSchema
Type: string
Property ClassName = java.lang.String
Property default Value = null
Direction: [IN]
-------------------------
pbsh aw - shows me the active wires
-----------------------------
Owner = com.scius.examples.helloworld
There are 1 wires registered.
-----------------------------------------
Title: Source to Target Message
Id: PROPERTY_TO_ACTION_WIRE:getMessageValue:setTargetMessage:com.scius.examples.helloworld.richapp.SourceView:com.scius.examples.helloworld.richapp.TargetView
Owner Id: com.scius.examples.helloworld
Ordinal: 100
Type: PROPERTY_TO_ACTION_WIRE
Source Name: getMessageValue
Source Entity ID: com.scius.examples.helloworld.richapp.SourceView
Source Param: null
Target Name: setTargetMessage
Target Entity ID: com.scius.examples.helloworld.richapp.TargetView
Target Param: null
Is Cross Page: false
-----------------------------
In the documentation the description of how a wire docking point is described as such.
In order to wire a docking or end point the location is uniquely identified by the following
OSGi console allows you to trace properties, so I registered each property.
pbt setMessageValue
pbt getMessageValue
osgi> pblt
-----------------------------------------
Registered Property Traces are:
-----------------------------------------
1. setMessageValue
2. getMessageValue
I tried again and this time there was more information from the trace
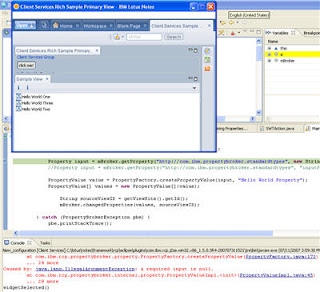
osgi> com.scius.examples.helloworld.richapp.SourceView:Text to be sent:hello world com.scius.examples.helloworld.richapp.SourceView$Listener:Sending Property Change Notification 2007/11/16 10:09:50.062 WARNING PBTRACE(getMessageValue) changedProperties was called. ::class.method=com.ibm.rcp.propertybroker.internal.PropertyBrokerDispatcher.changedProperties() ::thread=main ::loggername=com.ibm.rcp.propertybroker
So it looks like the notification is being sent correctly, but the TargetHandler.java isn't being called. Why ? This paragraph in the redpiece fills in the last piece of the puzzle.
However, as a view can be used in multiple places, sometimes even on the same page, a secondary ID is required to uniquely identify a view. If you declared your application through a perspective as described in 3.9, “Laying out applications programmatically” on page 53, you might not have provided any secondary IDs for your views. You must, however, always do so. Property broker assumes, that all views have secondary IDs.
So even though I was only using one instance of TargetView.java I needed to uniquely identify the View. I'd seen the ":fore" and ":back" seconday ids for the Color Swatch but thought that I didn't need them - once I added the ":hello" secondary id to the TargetView.java id and all references the sample worked.
 So there you have it - one working very simple property broker and wires example.
SnTT
I looked the the Color Swatch example that comes with the toolkit. It had multiple properties and three views and the naming convention for a beginner was a little convoluted.
I decided to create my own 'hello world' property broker example. I've attached a zip of the workspace it you want to run it or browse the files.
This purpose of this post is to share with you a very simple example to get to grips with the Property Broker and Wires. Something that the average Lotus/Notes Developer can look at, run and understand.
About the Hello World Example
I wanted a component where I could enter some text and using the property broker, send this to another component for display.
I started with the New > Project > Client Services > Client Services Project followed the prompts including choosing the 'rich basic application' which generates some of the bits required for the project. I then looked at the Color Swatch sample and worked out which parts needed changing. If you need step by step instructions on how to create a composite application, wires and actions in Expeditor then you should look at the redpiece, redbook, and the tutorial posted in the nd8 forum .
So lets have a quick look at the parts of the puzzle.
Perspective.java - this pulls the components/view parts into the application and is one of the first files run
SourceView.java - the view part that contains, the field to enter the message and a button to trigger the location of a property, changing the value and sending the notification that a property had changed
TargetView.java - the view part that sets the text box with the value of the change property
TargetHandler.java - the action that is called by the property broker, and checks if the event is a property change event, and calls the TargetView to update the text box with the new value.
source.wsdl - contains getSourceMessage action and outgoing property MessageItemValue
target.wsdl - contains setTargetMessage action and incoming property MessageItemValue
I had all the parts of the puzzle there, but I couldn't get the Wiring Properties Editor to produce the same WSDL file as the Color Swatch example, so in the end I updated the file manually to set the actionNameParameter attribute and remove the boundTo="request-attribute" attribute. I also renamed the <portlet:param name/> to setMessageValue for target.wsdl and getMessageValue for source.wsdl
I could run up the application, but nothing happened. I added a few debug lines and I could see that the property was being set in java but what about the property broker.The post on the Composite App details how to trouble shoot with the OSGi console. You can enter these commands in the eclipse console at the osgi>
pbsh p - showed me the current properties
-----------------------------------------
Owner = com.scius.examples.helloworld
There are 2 properties registered.
-----------------------------------------
Name: setMessageValue
Namespace: http://www.w3.org/2001/XMLSchema
Type: string
Class: class com.ibm.rcp.propertybroker.internal.property.PropertyImpl
Default: null
Direction: [IN]
Is Wired: NO
-----------------------------------------
Name: getMessageValue
Namespace: http://www.w3.org/2001/XMLSchema
Type: string
Class: class com.ibm.rcp.propertybroker.internal.property.PropertyImpl
Default: null
Direction: [OUT]
Is Wired: YES
-----------------------------------------
pbsh a - shows me the actions
-----------------------------
NAME: getSourceMessage
Handler Type: SWT_ACTION
Runnable Type: com.scius.examples.helloworld.actions.SourceAction
Owner ID: com.scius.examples.helloworld
Name Parameter: ACTION_NAME
Parameters: 1 parameters
Property = getMessageValue
Property NS = http://www.w3.org/2001/XMLSchema
Type: string
Property ClassName = java.lang.String
Property default Value = null
Direction: [OUT]
-----------------------------
NAME: setTargetMessage
Handler Type: SWT_ACTION
Runnable Type: com.scius.examples.helloworld.actions.TargetHandler
Owner ID: com.scius.examples.helloworld
Name Parameter: ACTION_NAME
Parameters: 1 parameters
Property = setMessageValue
Property Title =
Property NS = http://www.w3.org/2001/XMLSchema
Type: string
Property ClassName = java.lang.String
Property default Value = null
Direction: [IN]
-------------------------
pbsh aw - shows me the active wires
-----------------------------
Owner = com.scius.examples.helloworld
There are 1 wires registered.
-----------------------------------------
Title: Source to Target Message
Id: PROPERTY_TO_ACTION_WIRE:getMessageValue:setTargetMessage:com.scius.examples.helloworld.richapp.SourceView:com.scius.examples.helloworld.richapp.TargetView
Owner Id: com.scius.examples.helloworld
Ordinal: 100
Type: PROPERTY_TO_ACTION_WIRE
Source Name: getMessageValue
Source Entity ID: com.scius.examples.helloworld.richapp.SourceView
Source Param: null
Target Name: setTargetMessage
Target Entity ID: com.scius.examples.helloworld.richapp.TargetView
Target Param: null
Is Cross Page: false
-----------------------------
In the documentation the description of how a wire docking point is described as such.
In order to wire a docking or end point the location is uniquely identified by the following
- The property’s namespace
- The property’s name
- The property’s type
- The component’s entity ID
OSGi console allows you to trace properties, so I registered each property.
pbt setMessageValue
pbt getMessageValue
osgi> pblt
-----------------------------------------
Registered Property Traces are:
-----------------------------------------
1. setMessageValue
2. getMessageValue
I tried again and this time there was more information from the trace
osgi> com.scius.examples.helloworld.richapp.SourceView:Text to be sent:hello world com.scius.examples.helloworld.richapp.SourceView$Listener:Sending Property Change Notification 2007/11/16 10:09:50.062 WARNING PBTRACE(getMessageValue) changedProperties was called. ::class.method=com.ibm.rcp.propertybroker.internal.PropertyBrokerDispatcher.changedProperties() ::thread=main ::loggername=com.ibm.rcp.propertybroker
So it looks like the notification is being sent correctly, but the TargetHandler.java isn't being called. Why ? This paragraph in the redpiece fills in the last piece of the puzzle.
However, as a view can be used in multiple places, sometimes even on the same page, a secondary ID is required to uniquely identify a view. If you declared your application through a perspective as described in 3.9, “Laying out applications programmatically” on page 53, you might not have provided any secondary IDs for your views. You must, however, always do so. Property broker assumes, that all views have secondary IDs.
So even though I was only using one instance of TargetView.java I needed to uniquely identify the View. I'd seen the ":fore" and ":back" seconday ids for the Color Swatch but thought that I didn't need them - once I added the ":hello" secondary id to the TargetView.java id and all references the sample worked.
 So there you have it - one working very simple property broker and wires example.
Tuesday, November 13, 2007
SnTT : Using DXL and Java to update view designs
In a recent project I needed to apply a new corporate interface design to a bunch of databases. Modifications to frames, pages, forms and views. The objective was to provide consistency for the end users. Updating the views was by far, the most time consuming and tedious part. I needed to find a quicker and easier way before I ended up with RSI.
Enter DXL, with a dash of Java. I decided that Java and Eclipse would a better choice rather than Domino Designer and LotusScript. As a tool it would be independent of a notes database and there are plenty of dom and sax parsing libraries to choose from. I also chose to use eclipse so that I could ensure that the tool could be used and extended further by my client.
The objective of the tool was to export the DXL for all the views in a database, then add or modify particular elements to change the style, colours and which shared buttons appear for each view. The modified DXL would then be imported into the database to make the changes.
Below are snippets of the important pieces of the puzzle.
Here I export the views DXL into the DOM parser
note.setSelectViews(true);
note.buildCollection();
DxlExporter exporter = s.createDxlExporter();
org.w3c.dom.Document doc = fac.newDocumentBuilder().parse( new InputSource(new StringReader(exporter.exportDxl(note))));
Then manipulating the actionBar node background colour, borders and style
actionBar.setAttribute("bgcolor", "#004573");
actionBar.setAttribute("bordercolor", "black");
actionBarStyle.setAttribute("height", "40px");
actionBarStyle.setAttribute("repeat", "resize");
Element imageRef;
imageRef = (Element) actionBarStyle.getElementsByTagName("imageref").item(0);
if (imageRef == null)
{
imageRef = doc.createElement("imageref"); actionBarStyle.appendChild(imageRef);
}
imageRef.setAttribute("name", "fade-blue-blue.gif");
And then import the modified XML DOM into the database
ByteArrayOutputStream bs = new ByteArrayOutputStream();
OutputFormat fmt = new OutputFormat(doc);
XMLSerializer writer = new XMLSerializer(bs, fmt);
writer.serialize(doc);
Stream stream = s.createStream();
stream.setContents(new ByteArrayInputStream(bs.toByteArray()));
importer = s.createDxlImporter();
importer.setExitOnFirstFatalError(false);
importer.importDxl(stream, dbTarget);
Summary
There were a few gotchas where the importer expects elements in certain order and a particular nasty bug in 7.0.2 that corrupts the view/column formulas. As far as reducing the monotony in updating a design I would highly recommend this approach and hopefully you can take the skeleton code and extend for you own purpose.
You can download the workspace zip file. You'll need to update the location to the NCSO.jar and Notes.jar libraries from my location of c:\lotus\notes.
WARNING : You must ensure that you are using Lotus Notes Designer 7.0.3 otherwise you will corrupt your views - see this technote and try it on a test database. I haven't tried this in version 8.0 either.
SnTT
Enter DXL, with a dash of Java. I decided that Java and Eclipse would a better choice rather than Domino Designer and LotusScript. As a tool it would be independent of a notes database and there are plenty of dom and sax parsing libraries to choose from. I also chose to use eclipse so that I could ensure that the tool could be used and extended further by my client.
The objective of the tool was to export the DXL for all the views in a database, then add or modify particular elements to change the style, colours and which shared buttons appear for each view. The modified DXL would then be imported into the database to make the changes.
Below are snippets of the important pieces of the puzzle.
Here I export the views DXL into the DOM parser
note.setSelectViews(true);
note.buildCollection();
DxlExporter exporter = s.createDxlExporter();
org.w3c.dom.Document doc = fac.newDocumentBuilder().parse( new InputSource(new StringReader(exporter.exportDxl(note))));
Then manipulating the actionBar node background colour, borders and style
actionBar.setAttribute("bgcolor", "#004573");
actionBar.setAttribute("bordercolor", "black");
actionBarStyle.setAttribute("height", "40px");
actionBarStyle.setAttribute("repeat", "resize");
Element imageRef;
imageRef = (Element) actionBarStyle.getElementsByTagName("imageref").item(0);
if (imageRef == null)
{
imageRef = doc.createElement("imageref"); actionBarStyle.appendChild(imageRef);
}
imageRef.setAttribute("name", "fade-blue-blue.gif");
And then import the modified XML DOM into the database
ByteArrayOutputStream bs = new ByteArrayOutputStream();
OutputFormat fmt = new OutputFormat(doc);
XMLSerializer writer = new XMLSerializer(bs, fmt);
writer.serialize(doc);
Stream stream = s.createStream();
stream.setContents(new ByteArrayInputStream(bs.toByteArray()));
importer = s.createDxlImporter();
importer.setExitOnFirstFatalError(false);
importer.importDxl(stream, dbTarget);
Summary
There were a few gotchas where the importer expects elements in certain order and a particular nasty bug in 7.0.2 that corrupts the view/column formulas. As far as reducing the monotony in updating a design I would highly recommend this approach and hopefully you can take the skeleton code and extend for you own purpose.
You can download the workspace zip file. You'll need to update the location to the NCSO.jar and Notes.jar libraries from my location of c:\lotus\notes.
WARNING : You must ensure that you are using Lotus Notes Designer 7.0.3 otherwise you will corrupt your views - see this technote and try it on a test database. I haven't tried this in version 8.0 either.
Friday, November 09, 2007
Adventures in Expeditor Toolkit
I've been interested in the Composite Application features in Notes 8, in particular the ability to integrate rich client applications with notes. I've had some time recently to start looking in a little more detail. The interesting part is the way in which the PropertyBroker and Wires allows you to connect components together. I thought that I would have a go at creating a simple 'Hello World' example that I could integrate with a notes app.
I've seen the Demos of other composite apps, but there is nothing like rolling your sleeves up and getting into the code. The Expeditor 6.1.1 toolkit is available to use in either Eclipse or the Rational Application Developer and Software Architect IDE. I decided that I'd use the RSA I already had installed.
I followed the instructions and Installed the toolkit - there were no surpises. I then installed the PropertyBroker sample application, ran the application and it popped up under the 'open' menu. It pretty much confirmed that environments were working together - all going according to plan.
The next step was to create my own 'hello world' component.
I chose New > Client Services > Client Services Project, filled in all the default values and chose Rich Basic Application from the list of templates.
This generated some java files, properties and the plugin.xml files. The UI comes named as MainView.java, which you can either open with the Java editor or the Visual Editor. The Visual Editor gives you a graphical view of the Java code - similar to form designing in Domino Designer.
The next step was to add in a 'Hello' world label and then run it in Notes to comfirm that this new project can run in Notes 8
So what next ? I just wanted to see if I could add a break point and would that work with Notes, so I added a break point an ran the component using the Run > Debug menu (rather than the run option) - and yes the breakpoint worked - very cool.
Getting the wires and PropertyBroker working is the next challenge that I'm working through.....
I've seen the Demos of other composite apps, but there is nothing like rolling your sleeves up and getting into the code. The Expeditor 6.1.1 toolkit is available to use in either Eclipse or the Rational Application Developer and Software Architect IDE. I decided that I'd use the RSA I already had installed.
I followed the instructions and Installed the toolkit - there were no surpises. I then installed the PropertyBroker sample application, ran the application and it popped up under the 'open' menu. It pretty much confirmed that environments were working together - all going according to plan.
The next step was to create my own 'hello world' component.
I chose New > Client Services > Client Services Project, filled in all the default values and chose Rich Basic Application from the list of templates.
This generated some java files, properties and the plugin.xml files. The UI comes named as MainView.java, which you can either open with the Java editor or the Visual Editor. The Visual Editor gives you a graphical view of the Java code - similar to form designing in Domino Designer.
The next step was to add in a 'Hello' world label and then run it in Notes to comfirm that this new project can run in Notes 8

So what next ? I just wanted to see if I could add a break point and would that work with Notes, so I added a break point an ran the component using the Run > Debug menu (rather than the run option) - and yes the breakpoint worked - very cool.

Getting the wires and PropertyBroker working is the next challenge that I'm working through.....
Wednesday, November 07, 2007
SnTT: NotesSAX Parsing
Jake was asking about how to filter out malicous tags and code, I suggested using the NotesSAXParser after the HTML is converted to XHTML. I'm suprised that no one uses this as an approach, I mean fundementally XHTML is XML and the right tools for parsing this is the NotesSAXParser and NotesDOMParser. I figured that maybe there has not been a example of its use. So here is a sample class pulled right out of our home grown content management system - which uses NotesSAXParser - a little early for Show-and-Tell Thursdays...
SnTT
Sunday, November 04, 2007
www.scius.com.au version 2.0
I've finished updating the company's website. The original design (below) was a bit incipid and dull, something that I managed to throw together in my spare time. We decided to spend a little more time and effort on the design and implementation for version 2.0 (on the bottom of the post).

The website runs on our home grown product - a web content management system written in Domino. This is primarily so that the non technical members of the team can update content easily without effecting the design and layout.
I wanted to target four of the most popular browsers, IE version 6 and 7, Firefox 2.0 and Safari 3. I've managed to achieve this, XHTML and CSS W3C validation by following some simple rules.
CSS
1. for height use both the HEIGHT and MIN-HEIGHT
2. for width use both WIDTH and MIN-WIDTH
3. for BORDERS, MARGIN always use the LEFT, RIGHT, TOP and BOTTOM qualifiers rather than the MARGIN:5px 10px 5px 10px even though its CSS 1 valid
4. use MARGIN-LEFT:AUTO rather than TEXT-ALIGN:LEFT/RIGHT/CENTER
XHTML Transitional
1. only have one occurance of id="identifier" for elements (if you need more than one then it's a class="" approach)
2. close all tags with either a forward slash of closing tag i.e. <img src="" alt="" /> or </img>
3 ensure that each IMG tag has an ALT attribute
4 keep all tags lowercase (even through I've used uppercase for clarity in this post...ok)
5 avoid nesting elements unless its in a div. i.e. don't nest a <h1> in a <p>
There you go, one css file and a simple design which displays the same for all of my target browsers and validates against XHTML and CSS.
Subscribe to:
Posts (Atom)