So what can you do if the users browser does not have JavaScript enabled ?
Even in todays day and age, there are still a small minority of Joe Average users that either don't have JavaScript enabled through bad set-up or overzealous security settings. Even for an intranet you might like to be able to help out the poor employee that 'some how' has managed to turn off JavaScript and give them a message that all is not well with the page that they are using.
If you are using JavaScript or an Ajax toolkit for use in building forms that collect data, and rely on scripting to perform validation, then having JS disabled can be a problem.
Like most things there are various schools of thought and regardless of whether you choose progressive enhancement or graceful degradation, you should at least have an alternative to solely relying on JS being available.
I decided that a simple graceful degradation was the most appropriate option for me. That is, if JS is disabled then show an error message and disabled the Ajax form. The solution is so simple that I wasn't sure if it would be worth a post - but hey what the heck!
The idea is to hide all the forms and buttons using css, then if JS is disabled use the <noscript> tag to display a suitable message. If JS is available, then use the Dojo goodness to replace the style of the form objects.
In Domino, I added a subform to contain the contents between the noscript tag.
<noscript><img src="design/bb70/$file/error.jpg"/>
<h1>Error : JavaScript is not enabled</h1>
<p ><strong>Message:</strong>Your browser does not have JavaScript enabled and is required for this website to function correctly.</p>
<p ><strong>Action:</strong>You can do one of the following;</p>
<ul>
<li>Enable JavaScript for this website in your browser</li>
<li>Contact your IT support department or supplier to get JavaScript enabled in your browser</li>
</ul>
<p >You will need to refresh this page once JavaScript is enabled.</p>
</noscript>
In the sylesheet add in a new class.
.noscript {
display:none;
}
In the HTML node that contains the form, update (or add) the class to be "noscript", which hides the form so that it can't be submitted. Do the same for other nodes that rely on JS.
In the onload() event of the form, add the code to change the hidden forms, to be visible using the dojo.removeClass and dojo.addClass.
dojo.removeClass("caseForm","noscript");
dojo.addClass("caseForm","case-form");
dojo.removeClass("dojopopups","noscript");
You can take the noscript idea further and provide an alternative non JS form to submit, rather than an error message. You could also use server side validation as the definitive way ensure the forms submitted have been completed correctly.
Even if you don't expect JS to be disabled, implementing a system like the one described is simple and quick enough, that its not much extra effort and might just save you a headache or two.
Showing posts with label SnTT. Show all posts
Showing posts with label SnTT. Show all posts
Friday, August 01, 2008
Monday, May 19, 2008
SnTT : Dojo. It's not just eye candy
If you thought that Dojo was all about fancy widgets and eye candy for you web apps, then you might have missed another advantage of using Dojo. In fact, it's not just Dojo. Most of the popular toolkits provide the features to make OO in JavaScript easier. I'm using Dojo, so my third post on Dojo is all about how I used OO in Dojo.
The challenge.
Let me explain the challenge. I needed to build a few HTML forms (without resorting to the whole lotus workplace forms solution). The forms, while fairly short (the longest being 30 multiple choice questions), were complicated by the fact that a large majority needed to include the 'Other - please specify' additional to the simple radio and checkbox fields. In addition the users could also choose different paths through questions. As a user answers the questions the subsequent questions that they need to answer change.
I wanted to have the simplest user experience possible and in my opinion that means, if you can't fill in a field then it should be hidden away. In short, I wanted the field that captures the 'other' detail to be hidden until the 'other' choice is selected. Likewise, fields that are not available based on previously selected choices are also hidden.
To make it even simpler for the user I wanted to maintain the hidden fields choices. If the user changed their mind a few times, they would not need to repeat answering questions. I would also need to remove all the hidden values before the form was submitted so that the data sent to the server represented exactly what was on screen.
It sounds like a lot of work, for something so simple as filling in a few multiple choice fields - but I don't think of it has extra programming. Think of it as an investment in reducing the number of support calls.
So why Dojo ?
Sure, you could do all of this in plain old JS. Functions for this and functions for that, but wouldn't it be nice to be able to just write some simple JavaScript. Something like...
if(fielda.mandatorySelected()==false) {
// then record or show errors
}
or
fielda.visible(true);
fieldb.visible(false);
and maybe...
fielda.display();
fieldb.display();
Dojo.Declare.
Dojo gives you a great framework for OO using Dojo.declare for building JS classes. Its simple to implement, simple to reuse and easy to read. If you are reusing it then you're writing less lines of code. Which means less that the browser needs to download which in turn makes the pages load faster.
How did I use Dojo Declare ?
In the Notes form, the HTML looks like the screen shot below. A div for the radio or checkbox field with a unique id 'q8' and a div for the other field with a unique id of 'q8-other'. All pretty standard stuff.

I started by calling my class scius.AuditField. I won't reproduce all the functions as I've attached the JS file here.
dojo.declare("scius.AuditField", null,
{ ... } );
then I added in some member variables and the constructor. The constructor allows me to initially specify the visibility, and if this field has the 'other' field.
_id:null,
_other:"other",
_hasOther : null,
_isVisible : null,
_otherIdSuffix : "-other",
_otherFieldSuffix : "other",
constructor : function(id, isvisible, hasOther) {
this._id = id;
this._hasOther = hasOther;
this._isVisible = isvisible;
},
some setters and getters (or properties), which I can use to determine the visibility or set the visibility.
visible : function(isVisible) {
this._isVisible = isVisible;
},
isVisible : function() {
return this._isVisible;
},
The hiding and showing using CSS classes through hide() and show() which is called by the display() function. The display function also checks to see if it needs to display the 'other' field (see the source code attached).
hide : function(fieldid) {
dojo.removeClass(fieldid,'form-fields');
dojo.addClass(fieldid,'form-fields-hidden');
},
show : function(fieldid) {
dojo.removeClass(fieldid,'form-fields-hidden');
dojo.addClass(fieldid,'form-fields');
},
Next is the checking of mandatory fields function. Note I reused an existing function to determine the actual value of the radio button via the 'isRadioChecked(rbo)' line. I guess it should really be part of the class or a utility class of its own.....maybe one day it will !
mandatorySelected : function() {
var rbo= document.forms[0][this._id];
if(isRadioChecked(rbo)) {
if (this._hasOther && this.hasValue("other")) {
var oth = document.forms[0][this._id+this._otherFieldSuffix];
if (oth.value=="") {
return false;
} else {
return true;
}
} else {
return true;
}
} else {
return false;
}
},
So how did I use this class in the Form ?
As I had around 30 questions, I decided to store the questions in an array and initialize them in the Notes forms JSHeader object. Creation is fairly simple.
The format is scius.AuditField(domid, visible, hasOther).
var qlist = new Array();
...
qlist[8] = new scius.AuditField("q8",false, false);
qlist[9] = new scius.AuditField("q9",false, true);
....
I have a checkConditionalQuestion() function that gets called from the onClick() of each field, which checks the visibility of dependent fields.
function checkConditionalQuestion(cond_question) {
...
} else if (cond_question=="7") {
if (qlist[7].hasValue("yes")) {
qlist[8].visible(true);
qlist[9].visible(false);
}else if (qlist[7].hasValue("no")) {
qlist[9].visible(true);
qlist[8].visible(false);
}
qlist[7].display();
qlist[8].display();
qlist[9].display();
} else if (cond_question=="9") {
qlist[9].display();
}
...
}
You've already seen the checking of mandatory field values and of course there is the emptying of the invisible fields. Called after validation and before the submit.
function emptyInvisible() {
for (var i = 1; i <= 30; i++) {
if (qlist[i].isVisible()==false) {
qlist[i].empty();
}
}
}
Summary.
Using the Dojo.declare to create classes is more readable than the JS prototype way. The format is closer to the way you would create Object in LotusScript and Java and so is familiar and easier to read. I only scratched the surface of what's possible and I can see areas for improvement. If you are interested, here it is in action.
Next.
I think that a database containing the three articles as a download would be a useful starting place if you need to implement similar forms. I've already started pulling out the various components into a standalone application and I'd like to tidy up a few areas before releasing it. As soon as its ready I'll post it. I can't say when - it all depends on the workload over the next few months.
Thursday, February 28, 2008
SnTT : Dojo Stack Container for Wizards
Here is a simple tutorial of how you can use the Dojo stack container (dijit.layout.StackContainer) to make a multi-page (dijit.layout.ContentPane) wizard. The sort of thing where you can progressively lead users through completing a form or reading content. The tutorial also shows how you can integrate your own website styling rather than having to use the three shipped themes with Dojo. You can get all the dojo goodness such as ease of use and use your own styles at the same time.
The tutorial is in flash/camtasia format and is my second attempt at camtasia recording, which include my slow typing and excessive mouse movements - but you'll get the idea.
So enjoy the Dojo Stack Container tutorial.
The tutorial is in flash/camtasia format and is my second attempt at camtasia recording, which include my slow typing and excessive mouse movements - but you'll get the idea.
So enjoy the Dojo Stack Container tutorial.
Wednesday, February 06, 2008
SnTT : Dojo Dialogs for validation and help
Greetings,
It looks like 2008 started of nicely judging by the post and comments on the blogsphere in January. While most of you were getting insane brain dumps of all things Lotus and quite possibly bleeding yellow, I was doing the same as Stuart. I was also getting started on a new project, toiling away in the southern hemisphere - where we have experienced one of the wettest summers in the 10 years that I been in Sydney
One of the interesting announcements was the support for Dojo in the Domino 8.5 server (although seeing it is used in quikr I was expecting it at some point). Dojo has been on my list of things to look at for a while. I know that others prefer different tool kits and I've had a look at some of them. I guess knowing that dojo will ship with Domino is some indication that it will be better supported and less gotchas. So if you have only time to learn one, then dojo is a safe bet for Domino developers.
I've wanted to use dojo but never had a reason to use Ajax. For the new project there was specific functionality that I wanted and dojo looked like it could provide it. My requirements were that firstly I wanted to have a validation dialog that shows the user, in one hit, all of the fields that failed validation and why. I also needed to check that a user name wasn't already a registered user in the NAB (Domino Directory). I also wanted this to be cross browser and I also quite liked the way that lightshow and quickr fade the background and have a modal type effect where the user can't access the rest of the page.
This post explains the recipe and how to implement this is your own applications using dojo 1.0.2. If you want to see this in action I've linked to a flash movie. (my first effort in using Camtasia - thanks Carl)
Step1. download Dojo and mix with Domino.
Firstly, download the Dojo toolkit. I used 1.0.2. Then use the ridiculously easiest WebDAV method for uploading the toolkit into a database (really it's so easy that it almost hurts). Check out the instructions on the award winning bloggers website ( BTW, congratulations to Jake). Just make sure that 'design locking' is enabled.
Secondly, (and optionally) you can the run the Dojo test harness <dojo-root>\dijit\tests\runTests.html just to check that the installation is fine and dandy.
Step2. Libraries
Next we will need to include the appropriate dojo libraries for our use. You do this in the <HEAD> tag for your form.
</script>
<script type="text/javascript" src="http://dev.bonesbeyond70.com.au/development/bonesbeyond.nsf/dojo102/dojo/dojo.js" djConfig="isDebug: true, parseOnLoad: true"></script>
<style type="text/css">
@import "http://server/development/bonesbeyond.nsf/dojo102/dojo/resources/dojo.css";
@import "http://server/development/bonesbeyond.nsf/dojo102/dijit/themes/dijit.css";
@import "http://server/development/bonesbeyond.nsf/dojo102/dijit/themes/tundra/tundra.css";
</style>
<script language="JavaScript" type="text/javascript">
<!--
dojo.require("dijit.Dialog");
dojo.require("dijit.form.Button");
dojo.require("dojo.parser");
dojo.require("dijit.ProgressBar");
var baseurl = "http://server/development/bonesbeyond.nsf/";
// -->
</script>
Step 3 - Presentation and Dialog place holders
You'll also need to add the dojo styling to the Body tag as a class attribute on the Domino Form
"class=\"tundra\""
Add your fields into the form as you would for a web application. The validation will be done in JavaScript so you can leave out validation formulas.
Then we'll need two define the actual dialogs html, in this case I need two. One for a progress dialog so that if the web server, the directory query or connection is slow the user knows that something is happening. The second dialog will then display the results of the validation. We do this by defining two div areas that are hidden and displayed by dojo. Take note of the dojoType and id attributes.
<!--
dialog box for the progress
-->
<div dojoType="dijit.Dialog" id="dialog1" title="Validating your registration" loadingMessage="loading" >
<div id="progress">
<center>
<p>Please wait while we check your registration details.</p>
<div dojoType="dijit.ProgressBar" style="width:300px" jsId="jsProgress" id="downloadProgress">
</center>
</div>
</div>
</div>
<!--
dialog box for the error messages
-->
<div dojoType="dijit.Dialog" id="dialog2" title="Validating your registration" loadingMessage="loading" >
<div id="errors">
<img src="design/bb70/$file/error.jpg"/>
<div id="errorContainer" >
</div>
<button dojoType="dijit.form.Button" type="submit">OK</button>
</div>
</div>
Finally we then need a button to call a JavaScript function that handles the validation.
<input type="button" class="login-button" value="Register" onclick="validateForm()">
Step 4 - Validation
The validateForm() functions, starts by showing the progress dialog (dialog1) so that immediately the users knows that something is happening. You remember that I need to check if a user is registered (or not!). In the script this only happens if the username field contains a valid value. If the user name is empty I add the mandatory error message to the stack, skip checking the NAB and then continue to validate the rest of the form.
/*
* function to check mandatory fields, field properties and username availability
*/
function validateForm() {
var un=document.forms[0].username.value;
var errors = false;
var isavailable = true;
var user_msg = "";
showDialog();
if (un=="")
{
errors = true;
validateRestForm(errors, isavailable, user_msg);
} else {
if (isValidUserName(un)) {
dojo.xhrGet({
url: baseurl+'validateUser?OpenAgent&username='+un,
handleAs: "json",
load: function(responseObject, ioArgs) {
isavailable = responseObject.user[0].isavailable;
validateRestForm(errors, isavailable, user_msg);
}
});
} else {
errors = true;
user_msg = "<b>Username</b> contains one of the following invalid characters<br/> space / \ + & % @ # * ( ) ! $ [ ] <br/>";
validateRestForm(errors, isavailable, user_msg);
}
}
}
Step 5 - dojo.xhrGet and JSON
You might have noticed the dojo.xhrGet. In order to determine if a user is registered or not I have an agent that queries the Domino Directory ($Users) view and returns a JSON object that indicates if the user exists already. Note I had to add a 2 second delay in the agent to make the progress show.
{ "user": [{"isavailable": "false" }] } or { "user": [{"isavailable": "true" }] }
The validateRestForm() then continues to validate the form and the last steps are to open the dialog. I won't bother you with all the validation, but enclosed is the last field validation and the main flow. If there are no errors then the hideDialogs() function is called. If there are errors then the refreshDialogs() hides the progress dialog and display the error dialog (dialog2).
racgp = document.forms[0].racgpnumber.value
if (racgp == "") {
errors = true;
msg = msg + "RACGP/ACCRM "+mdt;
}
else
{
if(isValidRacgp(racgp)==false)
{
errors = true
msg=msg+"RACGP/ACCRM number is invalid
";
}
}
if (errors) {
var ob = document.getElementById("errorContainer")
ob.innerHTML = msg
refreshDialog();
}
else
{
hideDialog();
document.forms[0].submit();
}
}
Below are the functions that Hide, Show and Refresh the dialogs
/*
* show the progress dialog for slow connections and busy servers
*/
function showDialog() {
var dlg = dijit.byId('dialog1');
dijit.byId("downloadProgress").update({indeterminate: true});
dlg.show();
}
/*
* refresh the progress dialog with the error dialog
*/
function refreshDialog() {
var pg = dijit.byId('dialog1');
var dlg = dijit.byId('dialog2');
pg.hide();
dlg.show();
}
/*
* hide dialogs
*/
function hideDialog() {
var dlg = dijit.byId('dialog2');
var pg = dijit.byId('dialog1');
dlg.hide();
pg.hide();
}
Step 6 - You need HELP...(I've been told that before!)
The other requirement was that I had was to populate some context sensitive help. I used xhrGet and the dialogs to achieve this. The benefit of this approach is that users only pay the download penalty if the help is actually needed.
In terms of how this is implemented, the HTML dialogs are the same as the validations - with the exception of a help icon rather than an error icon and a different style. The help anchor link sends the unique helpid to a function that assembles it into a call.
<a href="#" onClick="getHelp('help+standard+drinks');return false">Standard Drink</a>
This time JSON is not required as the content is stored as HTML/Rich Text in the CMS (note the handleAs:text). The getHelp agent just queries the notes content document, gets the HTML and sends it to the dialog.
/*
* function to retrieve context sensitive help
* from the content, stored in the application
*/
function getHelp(helpid) {
showDialog();
dojo.xhrGet({
url: baseurl+'getHelp?OpenAgent&helpid='+helpid,
handleAs: "text",
load: function(response, ioArgs) {
var ob = document.getElementById("helpContainer")
ob.innerHTML = response
refreshDialog();
}
});
}
...and that's it.
When time permits, I'll en devour to produce a simple standalone database for download. I hope that entry will be of use to those of you that are hesitant to use dojo or ajax for your Domino web apps. I've shown that you don't need to use all of the dojo toolkit and widgits but that you can on a case-by-case basis use bits of the toolkits to enhance you web applications user experience. In fact I also used the JonDesign's Smooth Gallary 2.o (which is based on mootools) for the rotating images in the banner, so there is no reason why you can't mix and match toolkits when required.
 SnTT
SnTT
It looks like 2008 started of nicely judging by the post and comments on the blogsphere in January. While most of you were getting insane brain dumps of all things Lotus and quite possibly bleeding yellow, I was doing the same as Stuart. I was also getting started on a new project, toiling away in the southern hemisphere - where we have experienced one of the wettest summers in the 10 years that I been in Sydney
One of the interesting announcements was the support for Dojo in the Domino 8.5 server (although seeing it is used in quikr I was expecting it at some point). Dojo has been on my list of things to look at for a while. I know that others prefer different tool kits and I've had a look at some of them. I guess knowing that dojo will ship with Domino is some indication that it will be better supported and less gotchas. So if you have only time to learn one, then dojo is a safe bet for Domino developers.
I've wanted to use dojo but never had a reason to use Ajax. For the new project there was specific functionality that I wanted and dojo looked like it could provide it. My requirements were that firstly I wanted to have a validation dialog that shows the user, in one hit, all of the fields that failed validation and why. I also needed to check that a user name wasn't already a registered user in the NAB (Domino Directory). I also wanted this to be cross browser and I also quite liked the way that lightshow and quickr fade the background and have a modal type effect where the user can't access the rest of the page.
This post explains the recipe and how to implement this is your own applications using dojo 1.0.2. If you want to see this in action I've linked to a flash movie. (my first effort in using Camtasia - thanks Carl)
Step1. download Dojo and mix with Domino.
Firstly, download the Dojo toolkit. I used 1.0.2. Then use the ridiculously easiest WebDAV method for uploading the toolkit into a database (really it's so easy that it almost hurts). Check out the instructions on the award winning bloggers website ( BTW, congratulations to Jake). Just make sure that 'design locking' is enabled.
Secondly, (and optionally) you can the run the Dojo test harness <dojo-root>\dijit\tests\runTests.html just to check that the installation is fine and dandy.
Step2. Libraries
Next we will need to include the appropriate dojo libraries for our use. You do this in the <HEAD> tag for your form.
</script>
<script type="text/javascript" src="http://dev.bonesbeyond70.com.au/development/bonesbeyond.nsf/dojo102/dojo/dojo.js" djConfig="isDebug: true, parseOnLoad: true"></script>
<style type="text/css">
@import "http://server/development/bonesbeyond.nsf/dojo102/dojo/resources/dojo.css";
@import "http://server/development/bonesbeyond.nsf/dojo102/dijit/themes/dijit.css";
@import "http://server/development/bonesbeyond.nsf/dojo102/dijit/themes/tundra/tundra.css";
</style>
<script language="JavaScript" type="text/javascript">
<!--
dojo.require("dijit.Dialog");
dojo.require("dijit.form.Button");
dojo.require("dojo.parser");
dojo.require("dijit.ProgressBar");
var baseurl = "http://server/development/bonesbeyond.nsf/";
// -->
</script>
Step 3 - Presentation and Dialog place holders
You'll also need to add the dojo styling to the Body tag as a class attribute on the Domino Form
"class=\"tundra\""
Add your fields into the form as you would for a web application. The validation will be done in JavaScript so you can leave out validation formulas.
Then we'll need two define the actual dialogs html, in this case I need two. One for a progress dialog so that if the web server, the directory query or connection is slow the user knows that something is happening. The second dialog will then display the results of the validation. We do this by defining two div areas that are hidden and displayed by dojo. Take note of the dojoType and id attributes.
<!--
dialog box for the progress
-->
<div dojoType="dijit.Dialog" id="dialog1" title="Validating your registration" loadingMessage="loading" >
<div id="progress">
<center>
<p>Please wait while we check your registration details.</p>
<div dojoType="dijit.ProgressBar" style="width:300px" jsId="jsProgress" id="downloadProgress">
</center>
</div>
</div>
</div>
<!--
dialog box for the error messages
-->
<div dojoType="dijit.Dialog" id="dialog2" title="Validating your registration" loadingMessage="loading" >
<div id="errors">
<img src="design/bb70/$file/error.jpg"/>
<div id="errorContainer" >
</div>
<button dojoType="dijit.form.Button" type="submit">OK</button>
</div>
</div>
Finally we then need a button to call a JavaScript function that handles the validation.
<input type="button" class="login-button" value="Register" onclick="validateForm()">
Step 4 - Validation
The validateForm() functions, starts by showing the progress dialog (dialog1) so that immediately the users knows that something is happening. You remember that I need to check if a user is registered (or not!). In the script this only happens if the username field contains a valid value. If the user name is empty I add the mandatory error message to the stack, skip checking the NAB and then continue to validate the rest of the form.
/*
* function to check mandatory fields, field properties and username availability
*/
function validateForm() {
var un=document.forms[0].username.value;
var errors = false;
var isavailable = true;
var user_msg = "";
showDialog();
if (un=="")
{
errors = true;
validateRestForm(errors, isavailable, user_msg);
} else {
if (isValidUserName(un)) {
dojo.xhrGet({
url: baseurl+'validateUser?OpenAgent&username='+un,
handleAs: "json",
load: function(responseObject, ioArgs) {
isavailable = responseObject.user[0].isavailable;
validateRestForm(errors, isavailable, user_msg);
}
});
} else {
errors = true;
user_msg = "<b>Username</b> contains one of the following invalid characters<br/> space / \ + & % @ # * ( ) ! $ [ ] <br/>";
validateRestForm(errors, isavailable, user_msg);
}
}
}
Step 5 - dojo.xhrGet and JSON
You might have noticed the dojo.xhrGet. In order to determine if a user is registered or not I have an agent that queries the Domino Directory ($Users) view and returns a JSON object that indicates if the user exists already. Note I had to add a 2 second delay in the agent to make the progress show.
{ "user": [{"isavailable": "false" }] } or { "user": [{"isavailable": "true" }] }
The validateRestForm() then continues to validate the form and the last steps are to open the dialog. I won't bother you with all the validation, but enclosed is the last field validation and the main flow. If there are no errors then the hideDialogs() function is called. If there are errors then the refreshDialogs() hides the progress dialog and display the error dialog (dialog2).
racgp = document.forms[0].racgpnumber.value
if (racgp == "") {
errors = true;
msg = msg + "RACGP/ACCRM "+mdt;
}
else
{
if(isValidRacgp(racgp)==false)
{
errors = true
msg=msg+"RACGP/ACCRM number is invalid
";
}
}
if (errors) {
var ob = document.getElementById("errorContainer")
ob.innerHTML = msg
refreshDialog();
}
else
{
hideDialog();
document.forms[0].submit();
}
}
Below are the functions that Hide, Show and Refresh the dialogs
/*
* show the progress dialog for slow connections and busy servers
*/
function showDialog() {
var dlg = dijit.byId('dialog1');
dijit.byId("downloadProgress").update({indeterminate: true});
dlg.show();
}
/*
* refresh the progress dialog with the error dialog
*/
function refreshDialog() {
var pg = dijit.byId('dialog1');
var dlg = dijit.byId('dialog2');
pg.hide();
dlg.show();
}
/*
* hide dialogs
*/
function hideDialog() {
var dlg = dijit.byId('dialog2');
var pg = dijit.byId('dialog1');
dlg.hide();
pg.hide();
}
Step 6 - You need HELP...(I've been told that before!)
The other requirement was that I had was to populate some context sensitive help. I used xhrGet and the dialogs to achieve this. The benefit of this approach is that users only pay the download penalty if the help is actually needed.
In terms of how this is implemented, the HTML dialogs are the same as the validations - with the exception of a help icon rather than an error icon and a different style. The help anchor link sends the unique helpid to a function that assembles it into a call.
<a href="#" onClick="getHelp('help+standard+drinks');return false">Standard Drink</a>
This time JSON is not required as the content is stored as HTML/Rich Text in the CMS (note the handleAs:text). The getHelp agent just queries the notes content document, gets the HTML and sends it to the dialog.
/*
* function to retrieve context sensitive help
* from the content, stored in the application
*/
function getHelp(helpid) {
showDialog();
dojo.xhrGet({
url: baseurl+'getHelp?OpenAgent&helpid='+helpid,
handleAs: "text",
load: function(response, ioArgs) {
var ob = document.getElementById("helpContainer")
ob.innerHTML = response
refreshDialog();
}
});
}
...and that's it.
When time permits, I'll en devour to produce a simple standalone database for download. I hope that entry will be of use to those of you that are hesitant to use dojo or ajax for your Domino web apps. I've shown that you don't need to use all of the dojo toolkit and widgits but that you can on a case-by-case basis use bits of the toolkits to enhance you web applications user experience. In fact I also used the JonDesign's Smooth Gallary 2.o (which is based on mootools) for the rotating images in the banner, so there is no reason why you can't mix and match toolkits when required.
SnTT
Thursday, December 20, 2007
SnTT : Unit Testing In Domino
I've had this database of code that is a framework for Unit testing in Domino/LotusScript. Its somewhat similar to JUnit. I wrote it so that I could double check code that was high risk and to give me another level of confidence that it would cope with the unexpected. I've been meaning to add a little polish to the database before I release it into the community. I've finally got around to it this week (and just in time for SnTT). It's not 100% complete, but might be of use to someone and rather than it sitting on my disk I've published it as a project on OpenNTF (here).
Follow this link to find out what is JUnit?
JUnit fits into a technique for Test Driven Development (TDD) where the basic premise is that you write tests for a unit (function, method etc) before writing the actual code. You then write your intended function (or method etc) until it passes all of your pre-written tests. In practice this is quite a large shift in mindset for some programmers. However, writing unit tests without adopting the whole TDD can still be beneficial (and I believe is quite common). For me it means that I can have a set of tests that I can check against code quickly, in a repeatable way and if I need to refactor my code I can quickly determine the impact of those changes by the success (or failures) of the existing tests.
The 'Domino Unit Framework' (DUF) is the Domino (or maybe that should be LotusScript - although LUF isn't quite as funny) take on this framework. The database contains example code in the one and only agent, but here are a few snippets so that you can see how it works.
Dim OutputStream As NotesDatabaseOutputStream
Set OutputStream = New NotesDatabaseOutputStream(session, "", "DominoUnitResults.nsf")
Dim testObject As New Test("Test Objects", Outputstream)
Call testObject.AssertEqual(session.currentdatabase,Null)
You can also check for True or False, in the example below I have just passed a True/False but typically you would include your code that returns a true or false.
Call testTrue.AssertTrue(True)
Call testFalse.AssertFalse(False)
Call test.AssertFalse(object.myMethodThyatIExcepectToReturnFalse)
You can also group up a set of tests into a 'suite of tests' which you can get an overall pass or fail or maybe just group them into logical functions.
Dim testSuite As New TestSuite("isMemberTests", OutputStream)
Call testSuite.Add(test1)
Call test1.AssertEqual(True,isMember(vArray2,vArray1))
So what objects does this support ?
Currently the following objects are supported as they were the ones that I needed - I might added more later or maybe someone else might like to (if you fancy contributing).
Numeric
- integer
- long
- double
- currency
LS Date
Boolean (Integer)
String
NotesObjects
- NotesDocument (based on UNID)
- NotesDatabase (based on Replica Id)
Can I test my Own classes ?
You can also unit test your own custom classes. You will need to implement an isEqual method which the framework expects.
Dim tony As New Person
Dim emp As New Person
Call tony.init("Tony","A","Palmer")
Call emp.init("Tony","A","Palmer")
Call Test101.AssertEqual(tony,emp)
Class Person
...
Function isEqual(people As Person) As Integer
' add in your own code that determines equality or not.
End Function
..
End Class
How can I have a quick look ?
Just download the DUF Database from OpenNTF and then create a copy (without Documents) in the root directory with a name of DUFResults.nsf. Then in the DUF database run the 'Development / Unit Test Agent'. There are some screen shots here of the database here.
Until Next Year.
I expect that this will be my last SnTT post until after LS08, I'm not going but will spending my time following all the news remotely.
Merry Xmas (Happy Holidays!) and Happy New Year.
SnTT
Follow this link to find out what is JUnit?
JUnit fits into a technique for Test Driven Development (TDD) where the basic premise is that you write tests for a unit (function, method etc) before writing the actual code. You then write your intended function (or method etc) until it passes all of your pre-written tests. In practice this is quite a large shift in mindset for some programmers. However, writing unit tests without adopting the whole TDD can still be beneficial (and I believe is quite common). For me it means that I can have a set of tests that I can check against code quickly, in a repeatable way and if I need to refactor my code I can quickly determine the impact of those changes by the success (or failures) of the existing tests.
The 'Domino Unit Framework' (DUF) is the Domino (or maybe that should be LotusScript - although LUF isn't quite as funny) take on this framework. The database contains example code in the one and only agent, but here are a few snippets so that you can see how it works.
Dim OutputStream As NotesDatabaseOutputStream
Set OutputStream = New NotesDatabaseOutputStream(session, "", "DominoUnitResults.nsf")
Dim testObject As New Test("Test Objects", Outputstream)
Call testObject.AssertEqual(session.currentdatabase,Null)
You can also check for True or False, in the example below I have just passed a True/False but typically you would include your code that returns a true or false.
Call testTrue.AssertTrue(True)
Call testFalse.AssertFalse(False)
Call test.AssertFalse(object.myMethodThyatIExcepectToReturnFalse)
You can also group up a set of tests into a 'suite of tests' which you can get an overall pass or fail or maybe just group them into logical functions.
Dim testSuite As New TestSuite("isMemberTests", OutputStream)
Call testSuite.Add(test1)
Call test1.AssertEqual(True,isMember(vArray2,vArray1))
So what objects does this support ?
Currently the following objects are supported as they were the ones that I needed - I might added more later or maybe someone else might like to (if you fancy contributing).
Numeric
- integer
- long
- double
- currency
LS Date
Boolean (Integer)
String
NotesObjects
- NotesDocument (based on UNID)
- NotesDatabase (based on Replica Id)
Can I test my Own classes ?
You can also unit test your own custom classes. You will need to implement an isEqual method which the framework expects.
Dim tony As New Person
Dim emp As New Person
Call tony.init("Tony","A","Palmer")
Call emp.init("Tony","A","Palmer")
Call Test101.AssertEqual(tony,emp)
Class Person
...
Function isEqual(people As Person) As Integer
' add in your own code that determines equality or not.
End Function
..
End Class
How can I have a quick look ?
Just download the DUF Database from OpenNTF and then create a copy (without Documents) in the root directory with a name of DUFResults.nsf. Then in the DUF database run the 'Development / Unit Test Agent'. There are some screen shots here of the database here.
Until Next Year.
I expect that this will be my last SnTT post until after LS08, I'm not going but will spending my time following all the news remotely.
Merry Xmas (Happy Holidays!) and Happy New Year.
SnTT
Wednesday, November 21, 2007
SnTT : The Simplest Property Broker Example in Notes 8
Recap

I created a new composite application (CA) from the " - blank composite application - " template, which promptly opened to show me the message
"This application page does not contain any content".
I opened the application with Designer and added a view and a form - nice and simple. Next I wanted to add a few documents. I needed to edit the composite application and add the notes form and view. Then from the action > edit application you can access the composite application editor and under the right hand side flyout pane (components palette) is the form and view.
I dragged the view into the blank page and closed the CA Editor, it now looks like an old school Notes database. I could then add in a few data documents ready for the next steps.
Packaging the Plugin
What you need to do is package up the plugin into a format that you can install into ND8. This is through the tried and tested update-site-format. If you have applied patches or upgraded RAD/RSA you would be very familiar with this way of installing plugins and updates.
The instructions to update the plugin build properties, create a feature and generate an update site are in the tutorial "CompAppsTutorialPart2M4.pdf". I followed these instructions and built the update site. So far so good.
Installing a plugin
Back to the Notes application and the CA Editor. I need to add into the component palette my two ViewPart (TargetView and SourceView). To add components you right click, then choose Add Components > Add Components from Update Site.
My update site is in local directory, under my workspace directory. so I browsed to the site.xml and clicked OK. I was then given a dialog to select the components from the update site. Strangely the SourceView component was missing. No drama as it's the TargetView component that I needed anyway. I added the component and then dragged it onto the main page. Positioning can be a tad awkward. If you want to have the component on the bottom most part of the screen then you will need to drag the cursor right to the bottom of the screen.
Wires
In the left hand menu I selected the 'source' component the Default View (notes) component and right click then wiring - I could see the 'sets the target message' action in TargetView but there was nothing to wire from. I could see the 'Default View' component but no property.
oops...More wires
 SnTT
SnTT
I've created a very simple, if not the simplest, property broker example using the Expeditor Toolkit. The idea is to understand the property broker and wires as part of the new breed of applications that integrate eclipse plugins and ND8.
In keeping with the 'simple' theme, I wanted a simple database...err...application that would have a simple notes view, when I select a document in the notes view the content in the column is sent to the text box on the TargetView view part.
Blank Composite Application
In keeping with the 'simple' theme, I wanted a simple database...err...application that would have a simple notes view, when I select a document in the notes view the content in the column is sent to the text box on the TargetView view part.
Blank Composite Application

I created a new composite application (CA) from the " - blank composite application - " template, which promptly opened to show me the message
"This application page does not contain any content".
I opened the application with Designer and added a view and a form - nice and simple. Next I wanted to add a few documents. I needed to edit the composite application and add the notes form and view. Then from the action > edit application you can access the composite application editor and under the right hand side flyout pane (components palette) is the form and view.
I dragged the view into the blank page and closed the CA Editor, it now looks like an old school Notes database. I could then add in a few data documents ready for the next steps.
Packaging the Plugin
What you need to do is package up the plugin into a format that you can install into ND8. This is through the tried and tested update-site-format. If you have applied patches or upgraded RAD/RSA you would be very familiar with this way of installing plugins and updates.
The instructions to update the plugin build properties, create a feature and generate an update site are in the tutorial "CompAppsTutorialPart2M4.pdf". I followed these instructions and built the update site. So far so good.
Installing a plugin
Back to the Notes application and the CA Editor. I need to add into the component palette my two ViewPart (TargetView and SourceView). To add components you right click, then choose Add Components > Add Components from Update Site.
My update site is in local directory, under my workspace directory. so I browsed to the site.xml and clicked OK. I was then given a dialog to select the components from the update site. Strangely the SourceView component was missing. No drama as it's the TargetView component that I needed anyway. I added the component and then dragged it onto the main page. Positioning can be a tad awkward. If you want to have the component on the bottom most part of the screen then you will need to drag the cursor right to the bottom of the screen.
Wires
In the left hand menu I selected the 'source' component the Default View (notes) component and right click then wiring - I could see the 'sets the target message' action in TargetView but there was nothing to wire from. I could see the 'Default View' component but no property.
oops...More wires
I had forgotten to add in the Notes side of the wiring. I created a new wiring properties (sample.wsdl), then opened the WSDL file with the editor and added a notesValue property, updated the namespace to cahelloworld.nsf and added a setter and getter action. The dialog is the same as the wiring editor in the Expeditor Toolkit.
It was still not working. Come to think - how would the view know which property change has happened ? In the column properties in the 'Programmatic Use' tab there is a new setting on the bottom just for this...
Composite Settings : Property

In the drop down there was only one choice 'notesValue'. When I went back to the Wiring Editor and the 'notesValue' property was showing. I wired them together and closed the CA Editor and the text box had a value. I selected the other documents and the text changed in the eclipse plugin.

I also found out why the SourceView wasn't listed when I came to add the component. In the plugin.xml the TargetView Extention element 'allowMultiple' wasn't set.
The eclipse documentation specifies that...
allowMultiple - flag indicating whether this view allows multiple instances to be created using IWorkbenchPage.showView(String id, String secondaryId). The default is false.
Summary
On the whole the packaging up of the site and installation was fairly easy - until I moved the cahelloworld.nsf to another workstation. I'm not entirely sure about the deployment and distribution of a CA. One of the great thing about Notes applications is that deploying an application and new version is an easy process. Update the templates, maybe run agents to modify documents and thats it. Even if you have a Dev/UAT/SIT/Production type environment, it is still relatively simple. CA's will add another level of complexity to the equation.
I also found that the Help > Support > View Trace (and View Log) is helpful in tracking down property broker issues. Have a go at installing the BIRT sample in a directory other that the Notes data directory and then having a look at the Trace and Log. BTW the report does not generate, so don't hang around waiting. The logs show why.
So, there you have it. Quite possibly the most simple eclipse plugin and notes 8 composite application example.
It was still not working. Come to think - how would the view know which property change has happened ? In the column properties in the 'Programmatic Use' tab there is a new setting on the bottom just for this...
Composite Settings : Property

In the drop down there was only one choice 'notesValue'. When I went back to the Wiring Editor and the 'notesValue' property was showing. I wired them together and closed the CA Editor and the text box had a value. I selected the other documents and the text changed in the eclipse plugin.

I also found out why the SourceView wasn't listed when I came to add the component. In the plugin.xml the TargetView Extention element 'allowMultiple' wasn't set.
The eclipse documentation specifies that...
allowMultiple - flag indicating whether this view allows multiple instances to be created using IWorkbenchPage.showView(String id, String secondaryId). The default is false.
Summary
On the whole the packaging up of the site and installation was fairly easy - until I moved the cahelloworld.nsf to another workstation. I'm not entirely sure about the deployment and distribution of a CA. One of the great thing about Notes applications is that deploying an application and new version is an easy process. Update the templates, maybe run agents to modify documents and thats it. Even if you have a Dev/UAT/SIT/Production type environment, it is still relatively simple. CA's will add another level of complexity to the equation.
I also found that the Help > Support > View Trace (and View Log) is helpful in tracking down property broker issues. Have a go at installing the BIRT sample in a directory other that the Notes data directory and then having a look at the Trace and Log. BTW the report does not generate, so don't hang around waiting. The logs show why.
So, there you have it. Quite possibly the most simple eclipse plugin and notes 8 composite application example.

Attachments.
com.scius.examples.helloworld.updatesite103.zip
cahelloworld-nsf.zip
SnTT
Thursday, November 15, 2007
SnTT : Quite possibly the simplest property broker example
I've completed step two of my "Adventures in Expeditor Toolkit". It is quite possibly the simplest property broker example. One target view, one source view and one property.
I looked the the Color Swatch example that comes with the toolkit. It had multiple properties and three views and the naming convention for a beginner was a little convoluted.
I decided to create my own 'hello world' property broker example. I've attached a zip of the workspace it you want to run it or browse the files.
This purpose of this post is to share with you a very simple example to get to grips with the Property Broker and Wires. Something that the average Lotus/Notes Developer can look at, run and understand.
About the Hello World Example
I wanted a component where I could enter some text and using the property broker, send this to another component for display.
I started with the New > Project > Client Services > Client Services Project followed the prompts including choosing the 'rich basic application' which generates some of the bits required for the project. I then looked at the Color Swatch sample and worked out which parts needed changing. If you need step by step instructions on how to create a composite application, wires and actions in Expeditor then you should look at the redpiece, redbook, and the tutorial posted in the nd8 forum .
So lets have a quick look at the parts of the puzzle.
Perspective.java - this pulls the components/view parts into the application and is one of the first files run
SourceView.java - the view part that contains, the field to enter the message and a button to trigger the location of a property, changing the value and sending the notification that a property had changed
TargetView.java - the view part that sets the text box with the value of the change property
TargetHandler.java - the action that is called by the property broker, and checks if the event is a property change event, and calls the TargetView to update the text box with the new value.
source.wsdl - contains getSourceMessage action and outgoing property MessageItemValue
target.wsdl - contains setTargetMessage action and incoming property MessageItemValue
I had all the parts of the puzzle there, but I couldn't get the Wiring Properties Editor to produce the same WSDL file as the Color Swatch example, so in the end I updated the file manually to set the actionNameParameter attribute and remove the boundTo="request-attribute" attribute. I also renamed the <portlet:param name/> to setMessageValue for target.wsdl and getMessageValue for source.wsdl
I could run up the application, but nothing happened. I added a few debug lines and I could see that the property was being set in java but what about the property broker.The post on the Composite App details how to trouble shoot with the OSGi console. You can enter these commands in the eclipse console at the osgi>
pbsh p - showed me the current properties
-----------------------------------------
Owner = com.scius.examples.helloworld
There are 2 properties registered.
-----------------------------------------
Name: setMessageValue
Namespace: http://www.w3.org/2001/XMLSchema
Type: string
Class: class com.ibm.rcp.propertybroker.internal.property.PropertyImpl
Default: null
Direction: [IN]
Is Wired: NO
-----------------------------------------
Name: getMessageValue
Namespace: http://www.w3.org/2001/XMLSchema
Type: string
Class: class com.ibm.rcp.propertybroker.internal.property.PropertyImpl
Default: null
Direction: [OUT]
Is Wired: YES
-----------------------------------------
pbsh a - shows me the actions
-----------------------------
NAME: getSourceMessage
Handler Type: SWT_ACTION
Runnable Type: com.scius.examples.helloworld.actions.SourceAction
Owner ID: com.scius.examples.helloworld
Name Parameter: ACTION_NAME
Parameters: 1 parameters
Property = getMessageValue
Property NS = http://www.w3.org/2001/XMLSchema
Type: string
Property ClassName = java.lang.String
Property default Value = null
Direction: [OUT]
-----------------------------
NAME: setTargetMessage
Handler Type: SWT_ACTION
Runnable Type: com.scius.examples.helloworld.actions.TargetHandler
Owner ID: com.scius.examples.helloworld
Name Parameter: ACTION_NAME
Parameters: 1 parameters
Property = setMessageValue
Property Title =
Property NS = http://www.w3.org/2001/XMLSchema
Type: string
Property ClassName = java.lang.String
Property default Value = null
Direction: [IN]
-------------------------
pbsh aw - shows me the active wires
-----------------------------
Owner = com.scius.examples.helloworld
There are 1 wires registered.
-----------------------------------------
Title: Source to Target Message
Id: PROPERTY_TO_ACTION_WIRE:getMessageValue:setTargetMessage:com.scius.examples.helloworld.richapp.SourceView:com.scius.examples.helloworld.richapp.TargetView
Owner Id: com.scius.examples.helloworld
Ordinal: 100
Type: PROPERTY_TO_ACTION_WIRE
Source Name: getMessageValue
Source Entity ID: com.scius.examples.helloworld.richapp.SourceView
Source Param: null
Target Name: setTargetMessage
Target Entity ID: com.scius.examples.helloworld.richapp.TargetView
Target Param: null
Is Cross Page: false
-----------------------------
In the documentation the description of how a wire docking point is described as such.
In order to wire a docking or end point the location is uniquely identified by the following
OSGi console allows you to trace properties, so I registered each property.
pbt setMessageValue
pbt getMessageValue
osgi> pblt
-----------------------------------------
Registered Property Traces are:
-----------------------------------------
1. setMessageValue
2. getMessageValue
I tried again and this time there was more information from the trace
osgi> com.scius.examples.helloworld.richapp.SourceView:Text to be sent:hello world com.scius.examples.helloworld.richapp.SourceView$Listener:Sending Property Change Notification 2007/11/16 10:09:50.062 WARNING PBTRACE(getMessageValue) changedProperties was called. ::class.method=com.ibm.rcp.propertybroker.internal.PropertyBrokerDispatcher.changedProperties() ::thread=main ::loggername=com.ibm.rcp.propertybroker
So it looks like the notification is being sent correctly, but the TargetHandler.java isn't being called. Why ? This paragraph in the redpiece fills in the last piece of the puzzle.
However, as a view can be used in multiple places, sometimes even on the same page, a secondary ID is required to uniquely identify a view. If you declared your application through a perspective as described in 3.9, “Laying out applications programmatically” on page 53, you might not have provided any secondary IDs for your views. You must, however, always do so. Property broker assumes, that all views have secondary IDs.
So even though I was only using one instance of TargetView.java I needed to uniquely identify the View. I'd seen the ":fore" and ":back" seconday ids for the Color Swatch but thought that I didn't need them - once I added the ":hello" secondary id to the TargetView.java id and all references the sample worked.
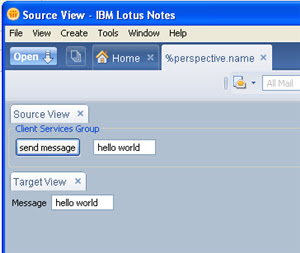 So there you have it - one working very simple property broker and wires example.
SnTT
I looked the the Color Swatch example that comes with the toolkit. It had multiple properties and three views and the naming convention for a beginner was a little convoluted.
I decided to create my own 'hello world' property broker example. I've attached a zip of the workspace it you want to run it or browse the files.
This purpose of this post is to share with you a very simple example to get to grips with the Property Broker and Wires. Something that the average Lotus/Notes Developer can look at, run and understand.
About the Hello World Example
I wanted a component where I could enter some text and using the property broker, send this to another component for display.
I started with the New > Project > Client Services > Client Services Project followed the prompts including choosing the 'rich basic application' which generates some of the bits required for the project. I then looked at the Color Swatch sample and worked out which parts needed changing. If you need step by step instructions on how to create a composite application, wires and actions in Expeditor then you should look at the redpiece, redbook, and the tutorial posted in the nd8 forum .
So lets have a quick look at the parts of the puzzle.
Perspective.java - this pulls the components/view parts into the application and is one of the first files run
SourceView.java - the view part that contains, the field to enter the message and a button to trigger the location of a property, changing the value and sending the notification that a property had changed
TargetView.java - the view part that sets the text box with the value of the change property
TargetHandler.java - the action that is called by the property broker, and checks if the event is a property change event, and calls the TargetView to update the text box with the new value.
source.wsdl - contains getSourceMessage action and outgoing property MessageItemValue
target.wsdl - contains setTargetMessage action and incoming property MessageItemValue
I had all the parts of the puzzle there, but I couldn't get the Wiring Properties Editor to produce the same WSDL file as the Color Swatch example, so in the end I updated the file manually to set the actionNameParameter attribute and remove the boundTo="request-attribute" attribute. I also renamed the <portlet:param name/> to setMessageValue for target.wsdl and getMessageValue for source.wsdl
I could run up the application, but nothing happened. I added a few debug lines and I could see that the property was being set in java but what about the property broker.The post on the Composite App details how to trouble shoot with the OSGi console. You can enter these commands in the eclipse console at the osgi>
pbsh p - showed me the current properties
-----------------------------------------
Owner = com.scius.examples.helloworld
There are 2 properties registered.
-----------------------------------------
Name: setMessageValue
Namespace: http://www.w3.org/2001/XMLSchema
Type: string
Class: class com.ibm.rcp.propertybroker.internal.property.PropertyImpl
Default: null
Direction: [IN]
Is Wired: NO
-----------------------------------------
Name: getMessageValue
Namespace: http://www.w3.org/2001/XMLSchema
Type: string
Class: class com.ibm.rcp.propertybroker.internal.property.PropertyImpl
Default: null
Direction: [OUT]
Is Wired: YES
-----------------------------------------
pbsh a - shows me the actions
-----------------------------
NAME: getSourceMessage
Handler Type: SWT_ACTION
Runnable Type: com.scius.examples.helloworld.actions.SourceAction
Owner ID: com.scius.examples.helloworld
Name Parameter: ACTION_NAME
Parameters: 1 parameters
Property = getMessageValue
Property NS = http://www.w3.org/2001/XMLSchema
Type: string
Property ClassName = java.lang.String
Property default Value = null
Direction: [OUT]
-----------------------------
NAME: setTargetMessage
Handler Type: SWT_ACTION
Runnable Type: com.scius.examples.helloworld.actions.TargetHandler
Owner ID: com.scius.examples.helloworld
Name Parameter: ACTION_NAME
Parameters: 1 parameters
Property = setMessageValue
Property Title =
Property NS = http://www.w3.org/2001/XMLSchema
Type: string
Property ClassName = java.lang.String
Property default Value = null
Direction: [IN]
-------------------------
pbsh aw - shows me the active wires
-----------------------------
Owner = com.scius.examples.helloworld
There are 1 wires registered.
-----------------------------------------
Title: Source to Target Message
Id: PROPERTY_TO_ACTION_WIRE:getMessageValue:setTargetMessage:com.scius.examples.helloworld.richapp.SourceView:com.scius.examples.helloworld.richapp.TargetView
Owner Id: com.scius.examples.helloworld
Ordinal: 100
Type: PROPERTY_TO_ACTION_WIRE
Source Name: getMessageValue
Source Entity ID: com.scius.examples.helloworld.richapp.SourceView
Source Param: null
Target Name: setTargetMessage
Target Entity ID: com.scius.examples.helloworld.richapp.TargetView
Target Param: null
Is Cross Page: false
-----------------------------
In the documentation the description of how a wire docking point is described as such.
In order to wire a docking or end point the location is uniquely identified by the following
- The property’s namespace
- The property’s name
- The property’s type
- The component’s entity ID
OSGi console allows you to trace properties, so I registered each property.
pbt setMessageValue
pbt getMessageValue
osgi> pblt
-----------------------------------------
Registered Property Traces are:
-----------------------------------------
1. setMessageValue
2. getMessageValue
I tried again and this time there was more information from the trace
osgi> com.scius.examples.helloworld.richapp.SourceView:Text to be sent:hello world com.scius.examples.helloworld.richapp.SourceView$Listener:Sending Property Change Notification 2007/11/16 10:09:50.062 WARNING PBTRACE(getMessageValue) changedProperties was called. ::class.method=com.ibm.rcp.propertybroker.internal.PropertyBrokerDispatcher.changedProperties() ::thread=main ::loggername=com.ibm.rcp.propertybroker
So it looks like the notification is being sent correctly, but the TargetHandler.java isn't being called. Why ? This paragraph in the redpiece fills in the last piece of the puzzle.
However, as a view can be used in multiple places, sometimes even on the same page, a secondary ID is required to uniquely identify a view. If you declared your application through a perspective as described in 3.9, “Laying out applications programmatically” on page 53, you might not have provided any secondary IDs for your views. You must, however, always do so. Property broker assumes, that all views have secondary IDs.
So even though I was only using one instance of TargetView.java I needed to uniquely identify the View. I'd seen the ":fore" and ":back" seconday ids for the Color Swatch but thought that I didn't need them - once I added the ":hello" secondary id to the TargetView.java id and all references the sample worked.
 So there you have it - one working very simple property broker and wires example.SnTT
Tuesday, November 13, 2007
SnTT : Using DXL and Java to update view designs
In a recent project I needed to apply a new corporate interface design to a bunch of databases. Modifications to frames, pages, forms and views. The objective was to provide consistency for the end users. Updating the views was by far, the most time consuming and tedious part. I needed to find a quicker and easier way before I ended up with RSI.
Enter DXL, with a dash of Java. I decided that Java and Eclipse would a better choice rather than Domino Designer and LotusScript. As a tool it would be independent of a notes database and there are plenty of dom and sax parsing libraries to choose from. I also chose to use eclipse so that I could ensure that the tool could be used and extended further by my client.
The objective of the tool was to export the DXL for all the views in a database, then add or modify particular elements to change the style, colours and which shared buttons appear for each view. The modified DXL would then be imported into the database to make the changes.
Below are snippets of the important pieces of the puzzle.
Here I export the views DXL into the DOM parser
note.setSelectViews(true);
note.buildCollection();
DxlExporter exporter = s.createDxlExporter();
org.w3c.dom.Document doc = fac.newDocumentBuilder().parse( new InputSource(new StringReader(exporter.exportDxl(note))));
Then manipulating the actionBar node background colour, borders and style
actionBar.setAttribute("bgcolor", "#004573");
actionBar.setAttribute("bordercolor", "black");
actionBarStyle.setAttribute("height", "40px");
actionBarStyle.setAttribute("repeat", "resize");
Element imageRef;
imageRef = (Element) actionBarStyle.getElementsByTagName("imageref").item(0);
if (imageRef == null)
{
imageRef = doc.createElement("imageref"); actionBarStyle.appendChild(imageRef);
}
imageRef.setAttribute("name", "fade-blue-blue.gif");
And then import the modified XML DOM into the database
ByteArrayOutputStream bs = new ByteArrayOutputStream();
OutputFormat fmt = new OutputFormat(doc);
XMLSerializer writer = new XMLSerializer(bs, fmt);
writer.serialize(doc);
Stream stream = s.createStream();
stream.setContents(new ByteArrayInputStream(bs.toByteArray()));
importer = s.createDxlImporter();
importer.setExitOnFirstFatalError(false);
importer.importDxl(stream, dbTarget);
Summary
There were a few gotchas where the importer expects elements in certain order and a particular nasty bug in 7.0.2 that corrupts the view/column formulas. As far as reducing the monotony in updating a design I would highly recommend this approach and hopefully you can take the skeleton code and extend for you own purpose.
You can download the workspace zip file. You'll need to update the location to the NCSO.jar and Notes.jar libraries from my location of c:\lotus\notes.
WARNING : You must ensure that you are using Lotus Notes Designer 7.0.3 otherwise you will corrupt your views - see this technote and try it on a test database. I haven't tried this in version 8.0 either.
SnTT
Enter DXL, with a dash of Java. I decided that Java and Eclipse would a better choice rather than Domino Designer and LotusScript. As a tool it would be independent of a notes database and there are plenty of dom and sax parsing libraries to choose from. I also chose to use eclipse so that I could ensure that the tool could be used and extended further by my client.
The objective of the tool was to export the DXL for all the views in a database, then add or modify particular elements to change the style, colours and which shared buttons appear for each view. The modified DXL would then be imported into the database to make the changes.
Below are snippets of the important pieces of the puzzle.
Here I export the views DXL into the DOM parser
note.setSelectViews(true);
note.buildCollection();
DxlExporter exporter = s.createDxlExporter();
org.w3c.dom.Document doc = fac.newDocumentBuilder().parse( new InputSource(new StringReader(exporter.exportDxl(note))));
Then manipulating the actionBar node background colour, borders and style
actionBar.setAttribute("bgcolor", "#004573");
actionBar.setAttribute("bordercolor", "black");
actionBarStyle.setAttribute("height", "40px");
actionBarStyle.setAttribute("repeat", "resize");
Element imageRef;
imageRef = (Element) actionBarStyle.getElementsByTagName("imageref").item(0);
if (imageRef == null)
{
imageRef = doc.createElement("imageref"); actionBarStyle.appendChild(imageRef);
}
imageRef.setAttribute("name", "fade-blue-blue.gif");
And then import the modified XML DOM into the database
ByteArrayOutputStream bs = new ByteArrayOutputStream();
OutputFormat fmt = new OutputFormat(doc);
XMLSerializer writer = new XMLSerializer(bs, fmt);
writer.serialize(doc);
Stream stream = s.createStream();
stream.setContents(new ByteArrayInputStream(bs.toByteArray()));
importer = s.createDxlImporter();
importer.setExitOnFirstFatalError(false);
importer.importDxl(stream, dbTarget);
Summary
There were a few gotchas where the importer expects elements in certain order and a particular nasty bug in 7.0.2 that corrupts the view/column formulas. As far as reducing the monotony in updating a design I would highly recommend this approach and hopefully you can take the skeleton code and extend for you own purpose.
You can download the workspace zip file. You'll need to update the location to the NCSO.jar and Notes.jar libraries from my location of c:\lotus\notes.
WARNING : You must ensure that you are using Lotus Notes Designer 7.0.3 otherwise you will corrupt your views - see this technote and try it on a test database. I haven't tried this in version 8.0 either.
SnTT
Wednesday, November 07, 2007
SnTT: NotesSAX Parsing
Jake was asking about how to filter out malicous tags and code, I suggested using the NotesSAXParser after the HTML is converted to XHTML. I'm suprised that no one uses this as an approach, I mean fundementally XHTML is XML and the right tools for parsing this is the NotesSAXParser and NotesDOMParser. I figured that maybe there has not been a example of its use. So here is a sample class pulled right out of our home grown content management system - which uses NotesSAXParser - a little early for Show-and-Tell Thursdays...
SnTT
SnTTThursday, October 04, 2007
SNTT : The value of OO and reuse
I've just finished a project and had some spare time. The domino website that we have been running for a particular client needed some new content and a email mail-out send to all the website members to let them know. So I started having a look at how I should do that and in 30 minutes I'd finished.
The website already have functionality to send confirmation emails, but mail-out functionality was not included in the original scope.
So how did I manage that ? The architecture of the website is built using xml templates for web content. Early on in the development, I'd decided that email templates should also use XML. After all the the mime messages that we need to generate are pretty much XML and I could extend the XMLRenderFactory to also do the email template to mime rendering.
So I started by creating the new email mailout template like the confirmation emails. The example below has been change slightly. note the <scm:xxx> nodes.
<scm:email>
<head>
<style type="text/css">
....
</style>
</head>
<table border="0" width="499px" cellspacing="0" cellpadding="0">
<tr><td bgcolor="#990033">
<img src="http://www.somewebsite/x.nsf/mailbanner.gif" width="500px" height="50px"/>
</td></tr>
<tr><td bgcolor="#990033" color="white"><h1>New Resources are available online</h1></td></tr>
<tr><td>
<p style="font-size:10px; color:#B10034;font-family:verdana">Dear
<scm:profile key="firstname"/> <scm:profile key="surname"/>
new resources are available on-line now.<br/><br/>
</p>
</td></tr>
<tr><td bgcolor="#990033">
<p class="footer"><img src="http://www.somewebsite/x.nsf/footerlogo.jpg"/></p>
</td></tr>
</table>
</scm:email>
I looked at the shared action that was currently used to send an registration emails.
Set confirmMessage = New SCMTemplateMailMessage(session,note)
confirmMessage.SendTo = note.email(0)
Call confirmMessage.SendMessage("register_confirm")
note.registration_sent = Now
Call note.Save(True,False)
I created a new one, and change two lines and added it to the form.
Set confirmMessage = New SCMTemplateMailMessage(session,note)
confirmMessage.SendTo = note.email(0)
Call confirmMessage.SendMessage("mailout_series2")
note.mailout_2 = Now
Call note.Save(True,False)
I ran it against a profile of a test member. Then I needed the ability to send bulk mail-outs so I wrapped the whole thing into an agent to run against selected members in the database.
Done.
I couldn't have done this if the architecture of the application hadn't been using an Object Oriented approach, abstracting the email message into a SCMTemplateMailMessage provided flexibility in reusing it for something that was outside the scope of the original design.
If someone questions the value of using OO techniques in Domino or Lotus Notes send them here.
The website already have functionality to send confirmation emails, but mail-out functionality was not included in the original scope.
So how did I manage that ? The architecture of the website is built using xml templates for web content. Early on in the development, I'd decided that email templates should also use XML. After all the the mime messages that we need to generate are pretty much XML and I could extend the XMLRenderFactory to also do the email template to mime rendering.
So I started by creating the new email mailout template like the confirmation emails. The example below has been change slightly. note the <scm:xxx> nodes.
<scm:email>
<head>
<style type="text/css">
....
</style>
</head>
<table border="0" width="499px" cellspacing="0" cellpadding="0">
<tr><td bgcolor="#990033">
<img src="http://www.somewebsite/x.nsf/mailbanner.gif" width="500px" height="50px"/>
</td></tr>
<tr><td bgcolor="#990033" color="white"><h1>New Resources are available online</h1></td></tr>
<tr><td>
<p style="font-size:10px; color:#B10034;font-family:verdana">Dear
<scm:profile key="firstname"/> <scm:profile key="surname"/>
new resources are available on-line now.<br/><br/>
</p>
</td></tr>
<tr><td bgcolor="#990033">
<p class="footer"><img src="http://www.somewebsite/x.nsf/footerlogo.jpg"/></p>
</td></tr>
</table>
</scm:email>
I looked at the shared action that was currently used to send an registration emails.
Set confirmMessage = New SCMTemplateMailMessage(session,note)
confirmMessage.SendTo = note.email(0)
Call confirmMessage.SendMessage("register_confirm")
note.registration_sent = Now
Call note.Save(True,False)
I created a new one, and change two lines and added it to the form.
Set confirmMessage = New SCMTemplateMailMessage(session,note)
confirmMessage.SendTo = note.email(0)
Call confirmMessage.SendMessage("mailout_series2")
note.mailout_2 = Now
Call note.Save(True,False)
I ran it against a profile of a test member. Then I needed the ability to send bulk mail-outs so I wrapped the whole thing into an agent to run against selected members in the database.
Done.
I couldn't have done this if the architecture of the application hadn't been using an Object Oriented approach, abstracting the email message into a SCMTemplateMailMessage provided flexibility in reusing it for something that was outside the scope of the original design.
If someone questions the value of using OO techniques in Domino or Lotus Notes send them here.
Subscribe to:
Posts (Atom)